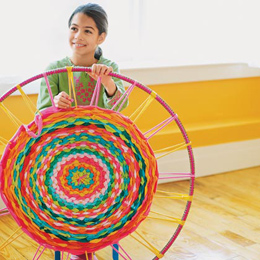
Zoals ik al eerder zei ben ik gek op DIY-en met restmateriaal. Via Pinterest kwam ik deze leuke tutorial tegen gemaakt van (oude) t-shirts èn zo gemaakt. Dit is de url naar de website met voorbeeldfoto's: http://familyfun.go.com/crafts/hula-hoop-rug-995304/
En hieronder de beschrijving in het Engels:
Hula Hoop
Rug by Nicole Blasenak Shapiro, Total time needed 2-3 hours
What does
it take to transform a pile of old T-shirts into spectacular works of woven
art? Just a spare hula hoop or embroidery hoop and the techniques we'll show
you here. The oversize looms and easy-to-use loops of T-shirt fabric make these
projects particularly appealing to beginning weavers. Learn the basic hoop
weaving technique by crafting a colorful accent rug to brighten up a room. And
if you want to take the weaving a little further, check out our basket and
chair pad weaves
Before you
begin, some terms you need to know: the warp is the material you string on the
hoop, the weft is the material you weave with.
Materials
Scissors
About a
dozen T-shirts
33-inch
hula hoop
Instructions
For the warp, cut 1-inch-wide loops from the
bodies of one or two tees (we found a boy's large worked best on our 33-inch
hoop), removing the hem and stopping at the sleeves. Ideally these loops should
all be the same color; we used two colors for clarity in our photographs.
You'll need a total of 11 loops. For the weft, cut at least 50 loops from the
remaining shirts. Save the unused sleeves for the basket project.
Stretch one warp loop over the hula hoop, as
shown.
Add and secure a second loop, perpendicular to
the first.
Repeat, filling in the spaces, until all 11 loops
are in place.
Push together two warp loops at the top of the
hula hoop, as shown. This creates an odd number of warp spokes in your wheel,
which allows the overunder pattern of the weft to alternate with each new row.
Secure the first weft loop to the center of
one of the warp spokes (we chose the doubled spoke from step 5) by wrapping it
around the warp and then looping it back through itself.
Begin weaving the weft over and under the warp
spokes, forming a tight spiral. For now, treat both parts of each warp spoke as
a single unit, weaving over or under the two together. As you work, push the
weft material toward the center of the hoop and keep it just snug. If you pull
the weft tight, the rug will develop lumps or bends. When you reach the end of the
piece of weft, add a new loop by threading it through the end of the first and
back through itself.
When your rug is about 8 inches across, begin
treating each warp spoke as two individual strips instead of a single unit,
weaving over or under each strand instead of going over or under the doubled
spoke. This increases the number of warp spokes, improving the structure of the
project. When you get to the two warp spokes that you pushed together at the
top of the loom, separate them. Treat one of the spokes as two individual
strips, but continue to treat the other as a single spoke. This maintains the
odd number of warp spokes.
When the rug is the size you want, but no
closer than 8 inches from the edge of the hula hoop, snip open your weft loop.
Tie the ends around a warp spoke, and tuck the
ends into the rug.
Cut the warp spokes off the hoop one at a
time.
Tie the ends in pairs, then trim them to make
a fringe or tuck them back into the rug.

Reacties
Een reactie posten